[23.04.05] UART - PC, Bluetooth
1. UART 통신
1-1 기본 개념
송신 : polling방식 ex) printf("Hello world!!"); -> AVR과 STM 모두
수신: interrupt방식 (Rx Interrupt)
(1) 비동기: 클럭 신호에 맞춰 데이터를 송수신하지 않고 별도의 부호비트(start/stop bit)를 붙여서 데이터를 주고 받는 방식
-> 동기에 비해 효율이 80%, 실질적으로 보내는 data는 8bit인데, start/stop 2bit가 추가되오 10비트를 주고받아야 함
-> '0' '1' 송수신 --> st(0)00110000stop(1) 0(st)00110001(1) ;값은 아스키코드로 표현
-오실로스코프로 Raw Data를 확인해본다.
(2) 동기식: 클럭 신호에 맞춰서 데이터를 송수신하는 방식
2-2 Circular Queue
※기본 요소 기술: Circular Queue(원형큐, 환형 버퍼, Ring 버퍼) -> 이전까지 1차원 array로 송신함, 이제 원형큐 방식 사용
char rx_buff[80];
- 그러나 여러 개의 command가 빠른 속도로 들어올 경우 user program( pc_command_processing함수)
에서 처리 하지 못하고 놓치는 경우가 발생
→ 여러 개의 command가 한 번에 들어와도 이를 circular queue에 buffering(저장)해 두면 user program에서 UART interrupt data를 loss 없이 처리가 가능 하다.
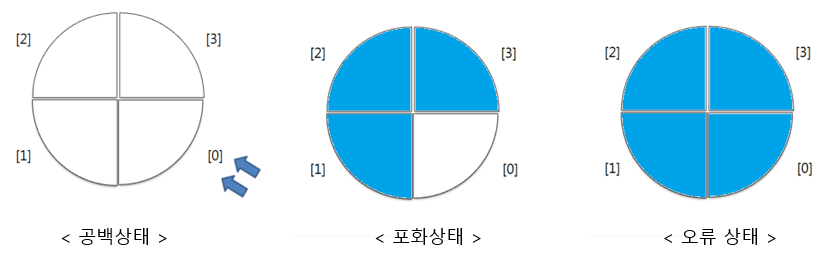
공백상태와 포화상태를 구분하기 위해 하나의 공간은 비워둬야 함, 즉 꽉 차면 오류 상태

그림처럼 처음에 input과 output pointer가 0에서 시작하고, 값이 들어오면 input pointer 가 +1 이 된다.

데이터가 다 들어오면 들어온 순서대로 첫번째 데이터부터 출력된다. 즉 FIFO 이다.
2. UART 구현
#include "main.h"
#include "uart.h"
#include <stdio.h>  //printf gets scanf fgets etc.
#include <string.h> //strncmp strcpy strcat strcmp etc.....

#define COMMAND_MAX 20 	 // 최대로 저장할 수 있는 command 수 (Buffer의 방의 개수)
#define COMMAND_LENGTH 50 // 1 line에 최대로 save 할수 있는 data 수

volatile int input_pointer = 0;   // interrupt에서 queue에 data를 저장하는 위치값
volatile int output_pointer = 0;  // pc_command_processing에서 가져가는 위치값
volatile unsigned char rx_buff[COMMAND_MAX][COMMAND_LENGTH];

volatile uint8_t rx_byte; // ComPortMaster로부터 들어온 RX Interrupt 1Byte를 수신하는 저장 변수.
volatile int rx_index = 0; // 1차원 배열 index

extern UART_HandleTypeDef huart1;
extern UART_HandleTypeDef huart2;

void HAL_UART_RxCpltCallback(UART_HandleTypeDef *huart);

/* 1.Copy from HAL_UART_RxCplitCallback of stm32f4xx_hal_uart to here
   	 DRIVER/STM32F4XX_HAL_Driver/Src/stm32f4xx.hal_uart.c/HAL_UART_RxCpltCallback
	UART로 부터 1Byte를 수신되면 H/W(CPU)가 call을 해준다.
	UART로 부터 STOP BIT가 뜨면 Rx interrupt가 발생한다.


*/
void HAL_UART_RxCpltCallback(UART_HandleTypeDef *huart)
{
	if(huart == &huart2)	//PC
	{
		unsigned char rx_data;
		rx_data = rx_byte;

		if(output_pointer % COMMAND_MAX == (input_pointer+1) % COMMAND_MAX) //queue full 상태
		{
				printf("Queue Full!!!!!!!\n");
				return;
		}
		else // normal 상태
		{
			if(rx_data == '\n' || rx_data == '\r')
			{
				rx_buff[input_pointer][rx_index] = '\0'; // 문장의 끝을 null로 replace.
				rx_index = 0;
				input_pointer++;
				input_pointer %= COMMAND_MAX;
				 //개선 사항 output_pointer
			}
			else
			{
				rx_buff[input_pointer][rx_index++] = rx_data;
				//rx_index++;
			}

		}
		//주의!!!: 반드시 HAL_UART_Receive_IT를 해줘야 다음 인터럽트가 발생된다.(즉, 서비스를 받을수있다.)
		HAL_UART_Receive_IT(&huart2, &rx_byte, 1); //PC UART RX Interrupt를 enable 시켜준다.
	}
    }
Circular Queue를 코드로 구현하였다. output_pointer % COMMAND_MAX == (input_pointer+1) % COMMAND_MAX는 포화 상태인 경우를 나타내며, 포화 상태가 되면 Queue Full을 프린트한다.
포화상태가 아닌 노멀 상태에서, rx_data가 문장의 끝이 아닌 경우에는 rx_buff에 데이터를 저장한다. 문장이 끝나서 \n 혹은 r이 오면 문장의 끝을 null로 replace하여 저장하고, input_pointer++하여 다음 위치를 가리키도록 한다. rx_index를 0으로 셋팅하여 첫 비트부터 다시 저장할 수 있도록 하고, input_pointer %= COMMAND_MAX; 를 선언하여 input pointer 가 0 부터 command Max-1 의 값이 되도록 한다.
huart2는 pc와 연결된 uart이고 huart1로 바꾸면 bluetooth와 연결이 가능하다.
extern void led_all_on();
extern void led_all_off();
extern void led_bar_blink_up();
extern void led_bar_blink_down();
extern void led_bar_sequential_up();
extern void led_bar_sequential_down();
extern void flower_on();
extern void flower_off();

void pc_command_processing()
{
	if(input_pointer != output_pointer) // rx_buff에 data가 들어 있다.
		{
	if(print)
		printf("rx_buff[%d] : %s\n", output_pointer, rx_buff[output_pointer]);
	//rx_buff[output_pointer] == rx_buff[output_pointer][0]와 같다.
	//&rx_buff[output_pointer][0]
	if(strncmp((const char *)rx_buff[output_pointer], "print_on", strlen("print_on")) == 0)  // strlen("print_on")) == 0 -> 8로 쓸 수 있음, but 정확도 위해
	{
		print = 1;
	}
	else if(strncmp((const char *)rx_buff[output_pointer], "print_off", strlen("print_off")) ==0)
	{
		print = 0;
	}
    }
print 값이 1 일 때만 rx_buff의 값을 출력하게 하는 코드이다.

의도대로 동작하는 것을 확인하였다. 체크박스는 꼭 체크한 후에 해야 한다. new line을 가능하게 한다.
2-1 PC통신
led 동작들을 uart pc 통신으로 제어해보았다.
void pc_command_processing()
{
	if(input_pointer != output_pointer) // rx_buff에 data가 들어 있다.
		{
	if(print)
		printf("rx_buff[%d] : %s\n", output_pointer, rx_buff[output_pointer]);
	//rx_buff[output_pointer] == rx_buff[output_pointer][0]와 같다.
	//&rx_buff[output_pointer][0]
	if(strncmp((const char *)rx_buff[output_pointer], "print_on", strlen("print_on")) == 0)  // strlen("print_on")) == 0 -> 8로 쓸 수 있음, but 정확도 위해
	{
		print = 1;
	}
	else if(strncmp((const char *)rx_buff[output_pointer], "print_off", strlen("print_off")) ==0)
	{
		print = 0;
	}
	if(strncmp((const char *)rx_buff[output_pointer], "led_all_on", strlen("led_all_on")) == 0)
	{
		led_all_on();
	}
	else if(strncmp((const char *)rx_buff[output_pointer], "led_all_off", strlen("led_all_off")) ==0)
	{
		led_all_off();
	}
	if(strncmp((const char *)rx_buff[output_pointer], "led_bar_blink_up", strlen("led_bar_blink_up")) == 0)
	{
		led_bar_blink_up();
	}
	else if(strncmp((const char *)rx_buff[output_pointer], "led_bar_blink_down", strlen("led_bar_blink_down")) ==0)
	{
		led_bar_blink_down();
	}
	if(strncmp((const char *)rx_buff[output_pointer], "led_bar_sequential_up", strlen("led_bar_sequential_up")) == 0)
	{
		led_bar_sequential_up();
	}
	else if(strncmp((const char *)rx_buff[output_pointer], "led_bar_sequential_down", strlen("led_bar_sequential_down")) ==0)
	{
		led_bar_sequential_down();
	}
	if(strncmp((const char *)rx_buff[output_pointer], "flower_on", strlen("flower_on")) == 0)
	{
		flower_on();
	}
	else if(strncmp((const char *)rx_buff[output_pointer], "flower_off", strlen("flower_off")) ==0)
	{
		flower_off();
	}

		output_pointer = (output_pointer+1) % COMMAND_MAX;
		//output_pointer를 1씩 증가.
	}

}
2-2 UART - BT 통신
void bt_command_processing()
{
	if(input_pointer != output_pointer) // rx_buff에 data가 들어 있다.
	{
		if(print)
			printf("rx_buff[%d] : %s\n", output_pointer, rx_buff[output_pointer]);
		//rx_buff[output_pointer] == rx_buff[output_pointer][0]와 같다.
		//&rx_buff[output_pointer][0]
		if(strncmp((const char *)rx_buff[output_pointer], "print_on", strlen("print_on")) == 0)  // strlen("print_on")) == 0 -> 8로 쓸 수 있음, but 정확도 위해
		{
			print = 1;
		}
		else if(strncmp((const char *)rx_buff[output_pointer], "print_off", strlen("print_off")) ==0)
		{
			print = 0;
		}
		if(strncmp((const char *)rx_buff[output_pointer], "led_all_on", strlen("led_all_on")) == 0)
		{
			led_all_on();
		}
		else if(strncmp((const char *)rx_buff[output_pointer], "led_all_off", strlen("led_all_off")) ==0)
		{
			led_all_off();
		}
		if(strncmp((const char *)rx_buff[output_pointer], "led_bar_blink_up", strlen("led_bar_blink_up")) == 0)
		{
			led_bar_blink_up();
		}
		else if(strncmp((const char *)rx_buff[output_pointer], "led_bar_blink_down", strlen("led_bar_blink_down")) ==0)
		{
			led_bar_blink_down();
		}
		if(strncmp((const char *)rx_buff[output_pointer], "led_bar_sequential_up", strlen("led_bar_sequential_up")) == 0)
		{
			led_bar_sequential_up();
		}
		else if(strncmp((const char *)rx_buff[output_pointer], "led_bar_sequential_down", strlen("led_bar_sequential_down")) ==0)
		{
			led_bar_sequential_down();
		}
		if(strncmp((const char *)rx_buff[output_pointer], "flower_on", strlen("flower_on")) == 0)
		{
			flower_on();
		}
		else if(strncmp((const char *)rx_buff[output_pointer], "flower_off", strlen("flower_off")) ==0)
		{
			flower_off();
		}

		output_pointer = (output_pointer+1) % COMMAND_MAX;
		//output_pointer를 1씩 증가.
	}

}
pc와 코드는 동일하다.
3. 과제
전화번호 뒷자리 네자리를 uart통신으로 pc에 출력하고, 이 때 송신되는 데이터값이 정확한지 오실로스코프로 분석한다.
이 때 데이터는 아스키코드 형태로 송신되므로, ex) '2' 는 0x32이고, '3' 은 0x33 임에 유의한다.


2350이 프린트되고 있다.